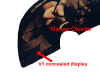
V1 Hardwire and
Hidden Display
(dedicated to
Wayne's genius, which made this all possible)
V1 Hardwire
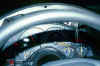
1. Remove the A-pillar by unscrewing the
two 7mm bolts that are covered by the T-top on the driver's side and pulling of
the plastic molding. This is where I ran the cord to the brain unit
(supplied with V1 display package) for the hidden display, but if you don't use
the display, this is where the power line would run.

2. Mount the V1 unit above the rear view mirror (yes, it
still picks up rear bogeys perfectly well), or wherever you want it.
3. Run the wire from the V1 down the A-Pillar and under
the dash to the panel under the steering wheel.
4. Connect it to the brain unit (for hidden display) or to
a power source for a regular hardwire. For a power source:
Pull the
cover off the fuse box. Pull the radio fuse (blue, #15). We chose
this fuse because it has power when the car is on, and does not when the car is
off.
Hidden Display
My hidden display is mounted inside the gauge cluster
underneath the oil pressure and engine temperature gauges. I bet you wish
you were that cool.
1. Remove the plastic molding lining the curved part of
the dash above the gauges. Just pull hard from all sides until it pops
off.
2. Unscrew the four screws holding in the plexiglass and
linings for the gauges (hereby referred to as the plexiglass unit thing).
3. Pull hard to undo the plastic clips and pull out the
plexiglass unit thing. The steering wheel has to be all the way down with
someone holding it as far as it will go.
4. Slide in the hidden display with the cord
attached. We used 3M double-sided tape to attach it.
5. Run the cord through the corner of the gauge cluster
down to the panel below the steering wheel.
6. Replace the plexiglass unit thing. The needles
will jump around each time the ground is touched, so don't worry, it's
normal. Make sure that all the needles will fall back to a 'zero' setting
when the plexiglass unit is in place and not get stuck under the plastic oulines.
We just manually pointed all the needles up, but the battery needle kept falling
under the plastic outline. We slid a wire clothes hanger under the
plexiglass unit thing as we moved it into place to hold the battery needle
up. What a pita, but look how fast I was going!
7. Attach the cord from the display unit to the brain.
8. Give life to the brain! We used a wiretap to tap
into the power line for the Harlan shiftlight, but if you don't have one here's
what you do:
Pull the
cover off the fuse box. Pull the radio fuse (blue, #15). We chose
this fuse because it has power when the car is on, and does not when the car is
off.
9. Ground the brain to one of the screws used to hold up
the panel under the steering wheel.
10. Tuck all the
wires away, nice and neat. (translation: just shove them inside that
panel)
11. Reattach the panel.
coming soon . . . MORE PICS!!!!


